Database Documentation
The (encodeD) system uses a Postgres implementation of a document store of a JSON-LD object hierarchy. Multiple views of each document are indexed in Elasticsearch for speed and efficient faceting and filtering. The JSON-LD object tree can be exported from Elasticsearch with a query, converted to RDF and loaded into a SPARQL store for arbitrary queries.
PostgreSQL RDB
When an object is POSTed to a collection, and has passed schema validation, it is inserted into the Postgres object store, defined in storage.py.
There are 7 tables in the RDB. Of these, Resource represents a single URI. Most Resources (otherwise known as Items or simply “objects” are represented by a single PropSheet, but the facility exists for multiple PropSheets per Resource (this is used for attachments and files, in which the actual data is stored as BLOBS instead of JSON).
The Key and Link tables are indexes used for performance optimziation. Keys are to find specific unique aliases of Resources (so that all objects have identifiers other than the UUID primary key), while Links are used to track all the JSON-LD relationships between objects (Resources). Specifically, the Link table is accessed when an Item is updated, to trigger reindexing of all Items that imbed the updated Item.
The CurrentPropSheet and TransactionRecord tables are used to track all changes made to objects via transactions.
Local Machine Development
Booting Up Local Database
The bin/dev-servers command, required as part of the boot-up process
(see the repo
README)
completely drops and restarts a local copy of the PostegreSQL server instance and database.
Script posts all the objects in tests/data/inserts (plus /tests/data/documents as attachments).
Then indexes them all in local elastic search. The server instance and ‘postgres’ database
are both destroyed when you kill the dev-servers process.
This temporary PostgreSQL database exists in the filesystem in your Unix-based system’s
/tmp/snovault/pgdata folder - which may be connected to as the hostname.
The database created is named ‘postgres’, with an admin user also named ‘postgres’,
and also should be accessible via localhost port 5432. No password is required.
By default, insert test data defined in Fourfront is loaded into the local database. See the inserts documentation for more information.
Backup & Loading of Production Database
Purpose
There may be many reasons to back-up live database data. At minimal, we should have periodic back-ups in case the production environment and database melt due to Murphy’s Law. Another reason may be to load live production data to local environment for more thorough testing when the test inserts might not be complete enough.
Prerequisites
Software
**PgAdmin** is recommended for performing back-ups, as well as other PgSQL-centric tasks. PgAdmin provides a GUI for interacting with your database(s), and also allows you to explore the PropSheets and other database data. You also need to make sure you have Amazon’s **Elastic Beanstalk Command Line Interface** (EB CLI), installed and configured with your Amazon key, as well as have a copy of the 4dn-encode private key in your /Users/YourName/.ssh folder. We’ll need to create a SSH tunnel through an Amazon EB/EC2 instance to our live production database - which is not accessible from the public internet for security reasons.
Configuration
Make sure your EB CLI is working and you’ve been able to SSH into an EC2 instance. You likely do this by running something like:
eb ssh -n 1 --custom "ssh -i /Users/alex/.ssh/4dn-encode.pem"
where 4nd-encode.pem is your copy of the 4dn-encode private key.
You’ll also need the hostname, port, username, database, and password (or connection string) of the RDS
(Amazon term for database instance/server) where the live database is located, which may be obtained by
logging into the AWS console and looking at the environment variables configured for the Elastic Beanstalk environment
whose database you want to access.
The hostname will likely resemble fourfront-webprod.co3gwj7b7tpq.us-east-1.rds.amazonaws.com:5432.
We aren’t going to write what the username, database, and password will resemble in a public document.
Back It Up
Once you have your prerequisites, do the following:
In a dedicated Terminal window, create an SSH tunnel via eb ssh command to the public RDS database. The command will look like this:
eb ssh -n 1 --custom "ssh -i /Users/alex/.ssh/4dn-encode.pem -L 5999:fourfront-webprod.co3gwj7b7tpq.us-east-1.rds.amazonaws.com:5432"
By using the ‘-L’ argument, you create a tunnel from your local port 5999 to a remote host:port on the EC2 instance you’re connecting to. Replace path to your 4dn-encode private key and host:port of remote RDS accordingly. N.B. We need to use
eb sshrather than plainsshbecauseeb sshtells Amazon to temporarily open port 22 (for SSHing) which would otherwise remain closed for security reasons.Open PgAdmin and, if not yet done, create a new ‘Server’ connection and call it “SSH to fourfront-webprod db” or something relevant. Make sure the hostname is localhost:5999, as we’ll be utilizing the SSH tunnel we created in step 1. Use the database, username, and password that are defined in the AWS EB environment variables configuration.
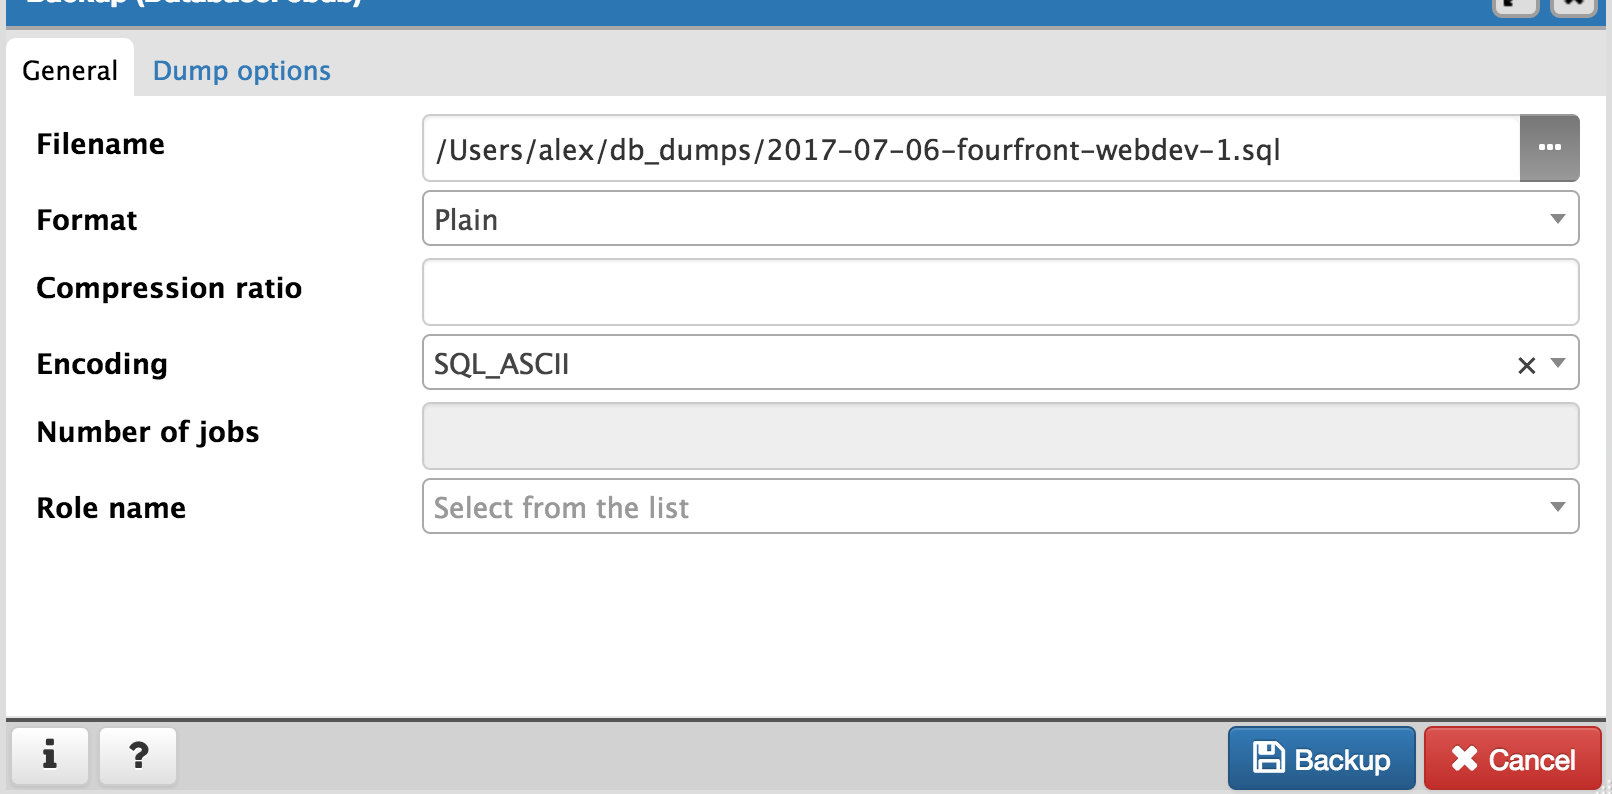
On the left tree-view pane of PgAdmin, should see the live RDS server, hopefully connected. Expand the server until see the database which have connected to. Right click on the database, and select “Backup…” from the drop-down menu.
It is important to set the right backup options. Your filename isn’t important but should make sense. The suggested format is
YYYY-MM-DD-ENVNAME-I.sql, e.g. ‘2017-07-19-fourfront-webprod-2.sql’`. The following options are important (spread across both tabs)- Select “Plain Text” for format.
- For encoding, select SQL_ASCII or similar. Your luck with UTF-8 may vary.
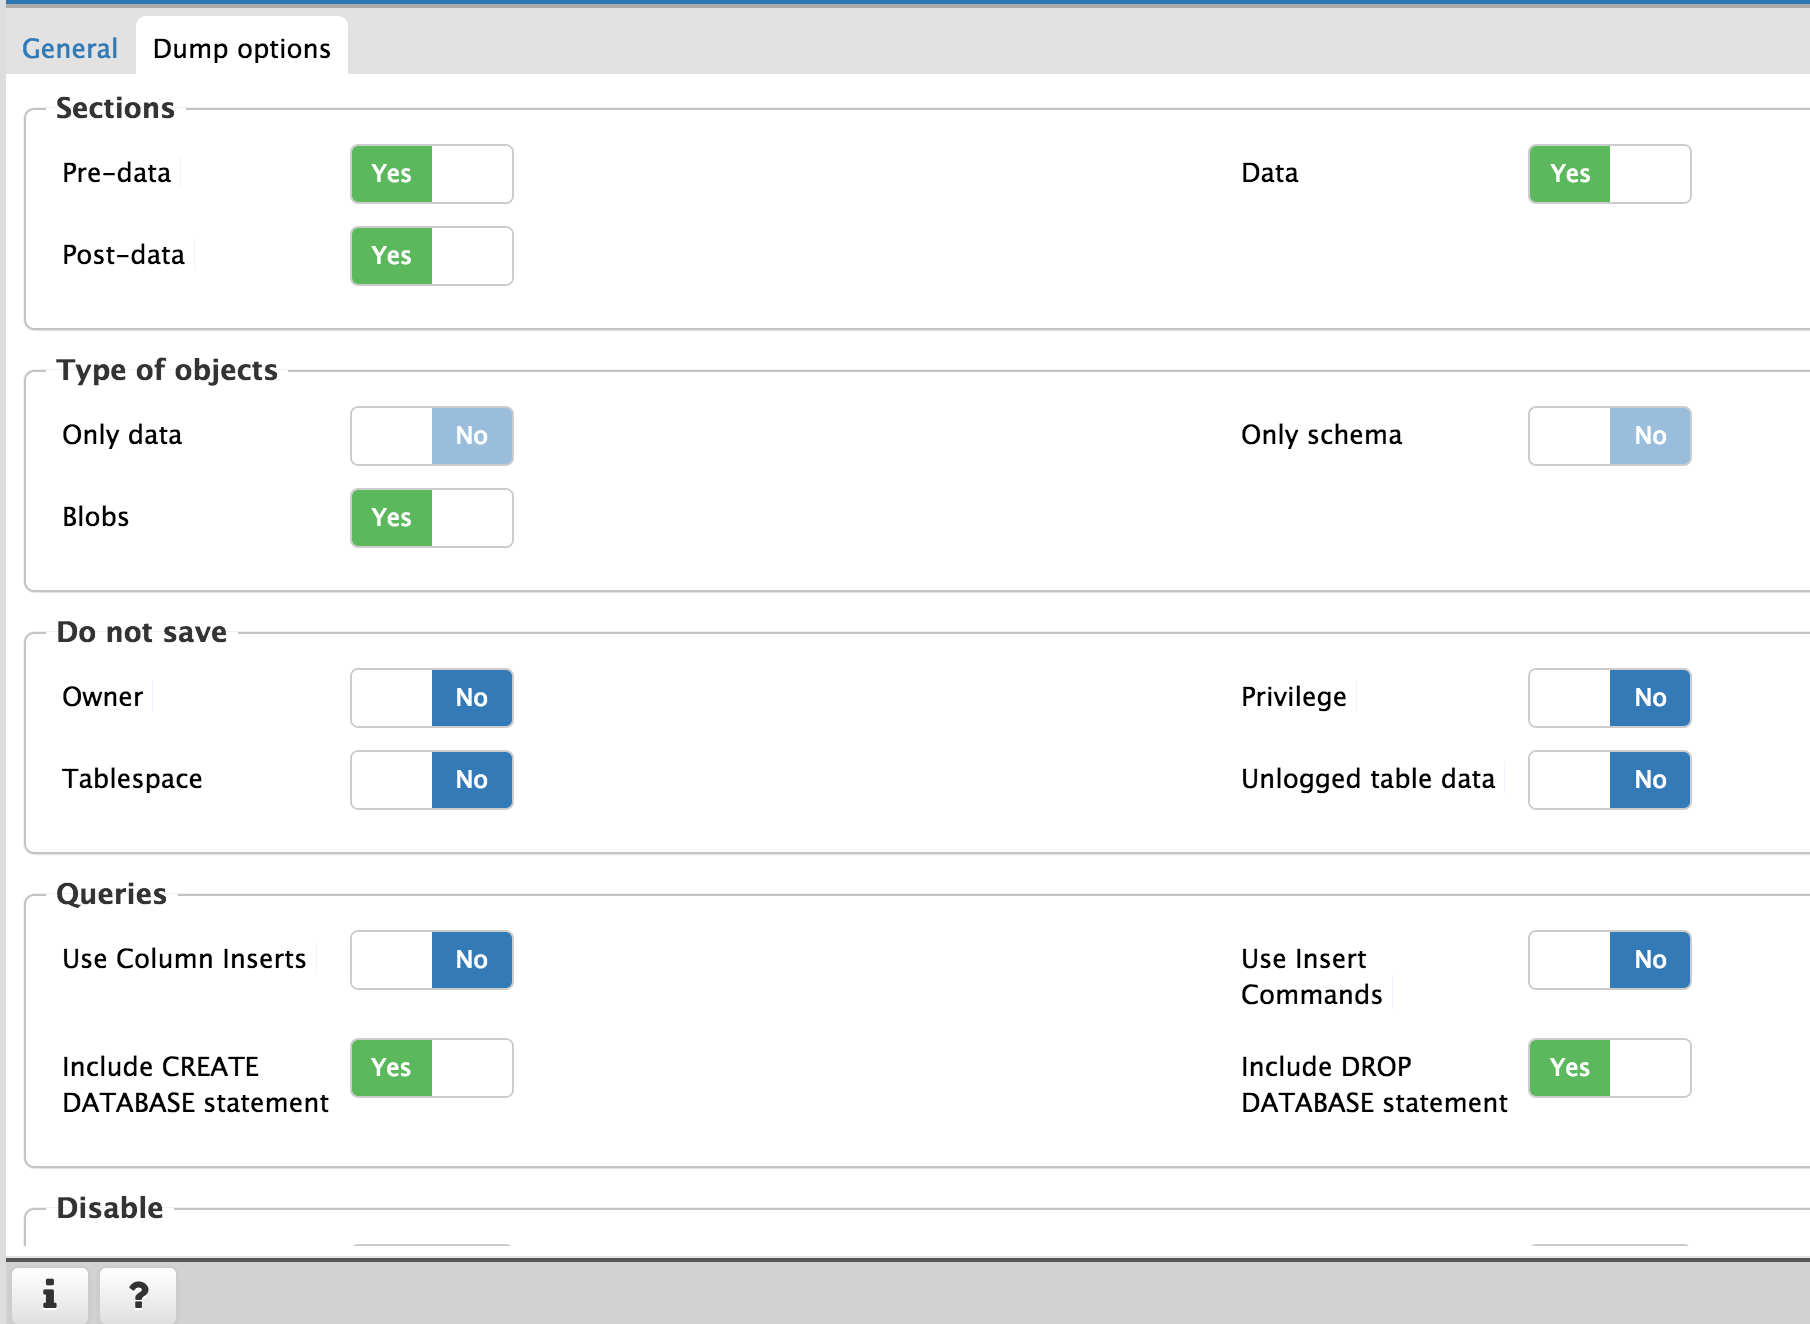
- Under “Dump Options” tab, ensure the following are set to “Yes”:
- Pre-Data
- Post-Data
- Data
- “Include DROP DATABASE statement”
- “Include CREATE DATABASE statement”
- “With OIDs”
- (Optional) “Use INSERT Commands”
- Other options may be left on default or adjusted to your needs.
Click “Backup”. PgAdmin should pop up a little box on bottom right of their GUI showing time elapsed and then a success or error message. This should take about 30 seconds (or longer) as of 2017-07-06.

Navigate to your newly backed up SQL file. There it is! Remember to disconnect the server and SSH tunnel when done.
Load It In
No point in backing up data if can’t get it to work again. Even if backing up for the sole sake of having back-ups, an untested back-up is no back-up at all.
If you backed up your .SQL file with no issues, you should be able to easily import the data back into production without issue by SSH tunneling to the production RDS again and running the .SQL file against the production database with the psql command. Don’t try this without reason, though, for the sake of production data stability.
If want to import into your local, there are a few extra steps needed, and a few things to keep in mind to keep your machine performant.
With your local environment shut down, run:
bin/dev-servers development.ini --app-name app --clear --init --load
as usual, but do not run
bin/pserveyet. This will boot up your local PostgreSQL server and database but not launch the web app yet.In your favorite text editor *which can handle large files***, open the SQL file which you backed up earlier. Do a search & replace for the user (from EB environment variable) and replace all instances with ‘postgres’, to match the user used to connect to your local server. You can also search & replace all instances of the database name -**if- you want to change it from production database name (not suggested). Assuming your database name in SQL file is different than ‘postgres’ (database name of database created by local environment), you will be creating another database on the same local PostgreSQL server, alongside the database with your test inserts (initially loaded in bin/dev-servers and named ‘postgres’ (not to be confused with user name of same value)).
Run:
psql -h /tmp/snovault/pgdata -U postgres -w postgres -a -f "/Users/alex/db_dumps/2017-06-29-fourfront-webdev-1.sql"
to run SQL file against your PostgreSQL server instance, replacing the SQL file path and name with your own. This will create and populate another database with your backed up data, alongside the one created and populated with test inserts by bin/dev-servers command.
Open up your development.ini file. Create a copy of it you’d like, or just adjust locally and don’t commit. Make the following changes:
Comment out the existing
sqlalchemy.urloption, and replace it with:sqlalchemy.url = postgresql://postgres@:5432/DATABASE_NAME?host=/tmp/snovault/pgdata
where DATABASE_NAME is database name of the database you loaded in with your SQL backup file. This will ensure you connect to your backed-up database when you boot bin/pserve instead of the test inserts database from bin/dev-servers.
Under both
[composite:indexer]&[composite:file_indexer]sections, add the following:timeout = 64800
By default, the indexer runs once a minute, and on local machine, it runs for 45 minutes. While running, the indexer uses a lot of energy and is very likely to overheat laptops – especially if running continuously. It may drain your battery faster than you can charge it. Adjusting the auto-indexing timeout to 48 hours instead of one minute alleviates most of this pain except for initial indexing-upon-bootup.
Save (or save copy of) adjusted development.ini file.
Finally, run
bin/pserve development.ini(if created a copy of development.ini, replace “development.ini” in command with your .ini filename). It should start indexing through tens of thousands of entries. Grab lunch while your laptop fans learn how to fly. Return to a local portal running with production data. Remember to revert your development.ini when want to load in test inserts instead of production data.
Afterthoughts
In lieu of PgAdmin, may use the command-line pg_dump tool to connect to production database (over SSH tunnel)
and save output to SQL file. Ensure the same configuration (ASCII, no compression, CREATE/DROP DATABASE command, …)
is set as for PgAdmin when running it.
Eventually, creating a shell or Python script to automate backup (and potentially import) may become a task, wherein the backup script could then perhaps be run on a scheduled basis.